Jump to:
- How to turn on Text Notifications
- Accessing and Enabling your Patient Portal
- Set up your Patient Portal Preferences
- Block Online Booking Access for Patients
How to turn on Text Message Notifications
If you would like to turn on the SMS service, go to Account > Subscription, and turn the SMS toggle switch on.

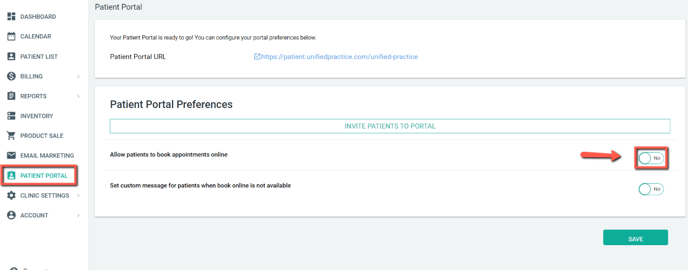
Accessing and Enabling Patient Portal
- To access your Patient Portal Settings, navigate to Patient Portal tab on the left.
- To access your Patient Portal URL, click on the link next to Patient Portal URL.
- To allow Patients to book online, toggle on the Allow patients to book appointments online toggle.
Set up your Patient Portal Preferences
The settings here work the same way that the previous online booking page worked. Below is an explanation of each setting:
- How far into the future can appointments be booked?
- How far out do you want your patients to see availability and possibly book an appointment?
- Minimum number of hours that an appointment can be scheduled in the future.
- When your patients are logged into their account to schedule an appointment, how soon do you want them to see availabilities (do you want patients to make same day appointments, do you want patients to see availabilities 24 hours into the future)?
- Minimum number of hours prior to an appointment that a patient can cancel or reschedule.
- Do you have a cancellation policy? How many hours before the appointment time do you allow your patients to cancel or reschedule their appointments?
- If you have Card Capture for Policy Enforcement set up, this setting will stop patients from being able to access the cancel/reschedule page within the number of hours you set. For example, if you enforce a late cancel fee within 24 hours of the time of the appointment, we recommend setting the "minimum number of hours prior to an appointment that a patient can cancel or reschedule" hours to something less than 24 hours. If both this setting and the CCPE setting are set to 24 hours, they essentially cancel each other out and will not allow your patients to cancel the appointment themselves online and will not allow the fee to automatically be assessed - you will have to do it manually.
- Round the appointment booking availabilities.
- Force the appointment start times to only land 15, 30, or 60 minute.
- This will override some Staging settings.
- Allow existing patients to select "No Preference" for the provider.
- If you are a multi-practitioner clinic and do not want patients to pick a specific practitioner, they can select "no preference" and they will be booked with whoever is first available based on the time they choose.
- All0w patient to cancel or reschedule an appointment online.
- If you do not want any patient to cancel or reschedule their appointment via the Patient Portal, disable this feature. All edits to appointments will be done manually by you.
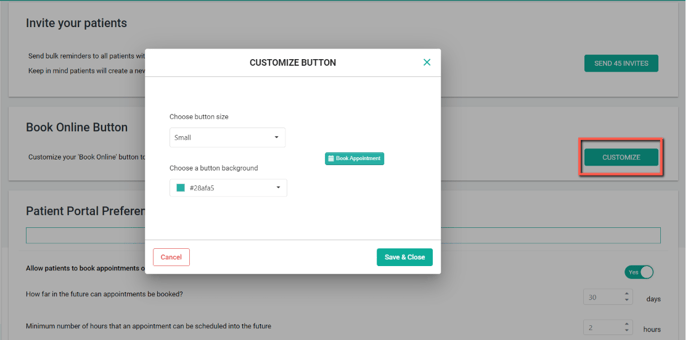
- Get Book Appointment button for your website.
- Click Customize under the Book Online Button section. Select the size and color of the Book Appointment button you want to embed on your website. Use the Save & Close button to apply. Once that is saved, under Embed Code, you can copy and paste the HTML code that now appears.

- Click Customize under the Book Online Button section. Select the size and color of the Book Appointment button you want to embed on your website. Use the Save & Close button to apply. Once that is saved, under Embed Code, you can copy and paste the HTML code that now appears.
Block Online Booking Access for Patients
If there is a patient that you would like to restrict online booking for -- please navigate to their Patient File, and click on the 3 dots towards the top right of the page to select "Block Online Booking Access":

When restricting a patient from online booking, you may include a customizable message that the patient will be able to see within their Patient Portal. To edit this message please navigate to Patient Portal, then Patient Portal Preference:


PLEASE NOTE: This feature is currently only available for the Enhanced and Premium subscriptions