View & Add Document Attachments within the Patient File
Learn how to easily take photos, view documents and attach files to the Patient File from the iPad and Web platforms
Jump to:
- Adding and deleting attachments on the iPad (Unified Practice EHR for TCM charting app)
- Adding and deleting attachments to the patient file within the web browser
iPad App (EHR for TCM)
You may add attachments to the Patient File from either the Patient List > Patient name or from within a chart note for a specific date of service. Attachments added to either place will be found in the Patient File > Files section as well as by tapping on the paperclip icon.
To Add Attachments to the Patient File:
- Navigate to the Patient List, and tap on a patient's name to open their file
- Tap the Paperclip Icon in the upper right corner
- You can tap Add Attachment and/or view previous attachments listed.
- Take a new photo, select a photo from your library, or browse for a file to select on your iPad.
- Name your attachment and tap Upload
Watch the video below for a step by step tutorial on how to View or Add Attachments:

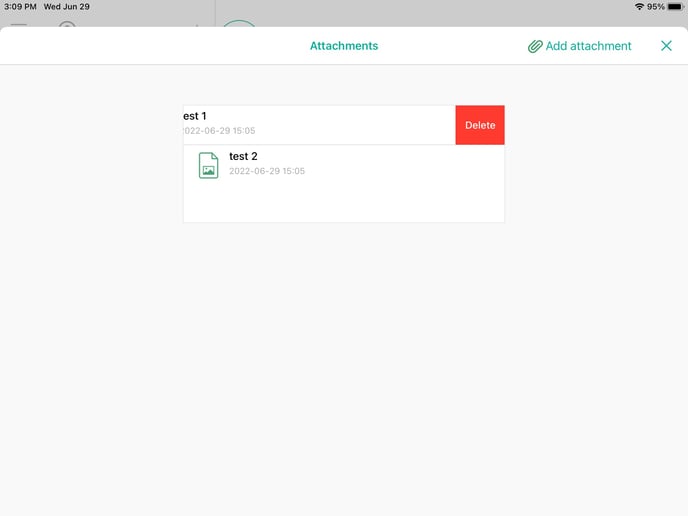
To remove attachments from the Patient File on the iPad:
- Touch and hold the file you want to delete while moving your finger to the left.
- Tap the red "Delete" button that appears.
Attachments to the Patient File are not attached to any particular date of service.
To attach photos or templates to a date of service, use the Draw Template feature found within each section of the Intake.
From the Web Browser
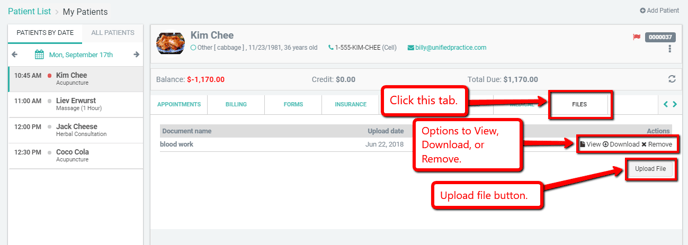
To Add or Remove Attachments to the Patient File:
- Navigate to the Patient List, and tap on a patient's name to open their file
- Click on the "Files" tab
- Click Upload File
- Select your file then Enter a name for it (the name from your computer will not transfer to Unified Practice)
- Enter a name for this upload above Choose File. (See Second image)
- Click Upload

.png?width=688&name=UPLOADNAME%20(1).png)
Pro Tips:
- Documents will be listed in the order they were uploaded to the file
- The uploaded files will be stamped with the date and time of upload