Clinic Settings
Here are video tutorials that will guide you through the set up of your Clinic Settings
Before you get started with using Unified Practice, you'll want to make sure your clinic settings are in place!
Business Information
This page will have your general business information, including your practice name, address, and business logo.
- Enter your practice name, the name of the clinic owner and manager, as well as your main business address.
- Next, be sure to upload your logo. Image files must be less than 1 MB, and PDF files are not compatible. You'll be able to upload standard image formats, including jpeg, png, and jpg files:
Locations & Rooms
In this section, you'll be able to:
- Add your location's name (if you have one location, most clinics will simply enter the name of their clinic.
- Set the location to be available for online booking.
- Change your actual location address (if it differs from your Business Information address.
- Add your rooms based on the number of physical spaces you will use to host your patients.
FAQ: What is the Service Facility NPI?
Answer: This NPI number mainly applies to larger facilities, such as hospitals, large treatment centers, etc. Your Group NPI will be entered in the Billing Information section, while your Individual NPI will be entered on your account page.
Clinic Staff
- In Clinic Staff, you'll be able to add and manage clinic staff members. You can invite a clinic staff member by clicking on Invite Staff and entering their name and email address. Only one unique email address can be registered to each user.
Once you've invited that clinic staff member, they will appear under Registration Invites as "Pending." That staff member will then be able to create their own username and password.
Once their account is registered, that account will be present under the Your Clinic Staff section. You choose to make that staff member inactive at anytime. You can also control that staff member's Roles & Permissions, by clicking on Details.
FAQ: How can I add an additional practitioner?
Answer: Our Subscriptions team will need to add an additional practitioner to your account. Just reach out to us at support@unifiedpractice.com and we'll get that initiated for you right away!
Clinic Staff Scheduling
How to set a recurring schedule:
- Start by navigating to Clinic Settings then Clinic Staff Scheduling.
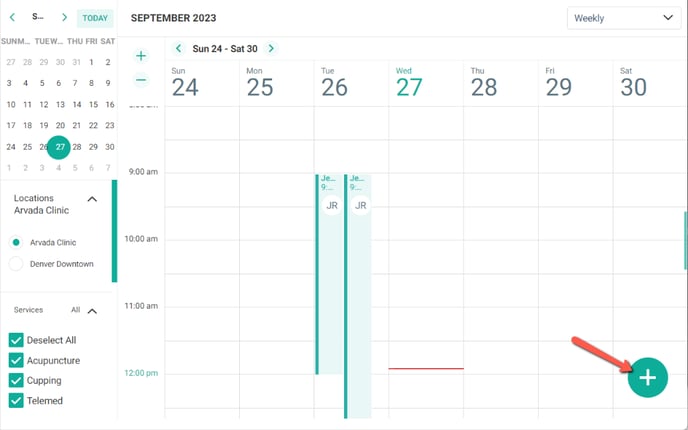
- Next, click the green and white plus sign in the bottom right hand corner.
- To create a schedule select the Practitioner from the drop down menu. Click the Calendar icon to select a start date for the schedule.
- To set if this schedule will Repeat, toggle Repeat Schedule to green. Then select when the schedule should end.
For example : This schedule is set to end "On Date" - 01/01/2026
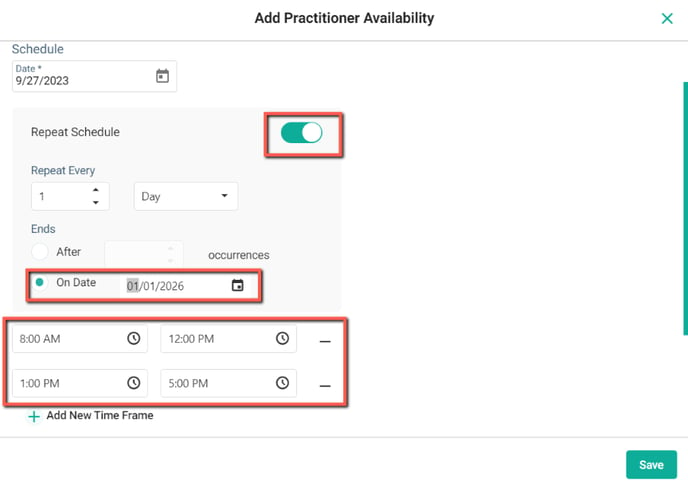
- To set a time frame first set the start time (left clock icon) then set the end time (right clock icon). If you need to add another time frame for this schedule click the green plus sign "Add New Time Frame".
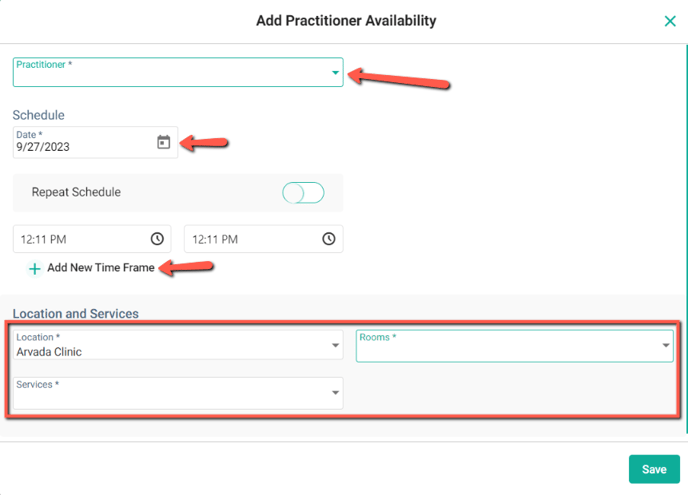
- Next, in the Locations and Services section, select the Location, Rooms and Services from the drop down menus for this schedule.
- Set the Location by clicking on the Location drop down menu. (You can only set 1 Location per schedule)
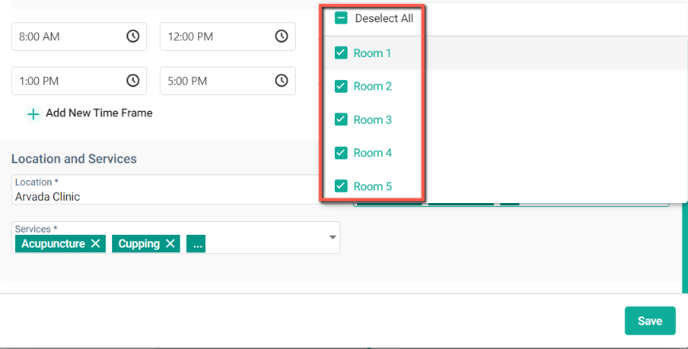
- Set the Rooms by clicking the Rooms drop down menu and selecting or deselecting each Room. (Multiple Rooms can be selected)
- Set the Services by clicking the Services drop down menu and selecting or deselecting each Service. (Multiple Services can be selected)

How to view specific schedules:
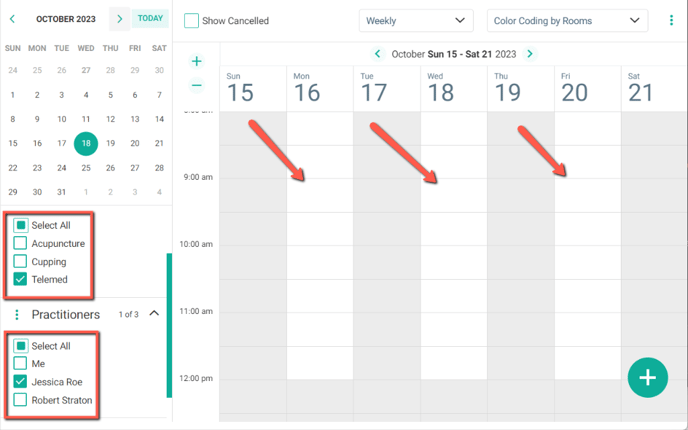
- The new schedules can be seen on the Calendar view and be sorted by the Calendar filters.
- This will allow the Clinic to see specific availabilities. (White boxes represent availability)
- For example : The image below is specifically showing Practitioner Jessica and when they are available for the Service - Telemed.
Need to make a one time schedule? To set a one time schedule, follow the same steps as above but do not toggle on Repeat Schedule.